Once you’ve developed and tested your changes in the staging environment, you can safely push those updates to the live (production) site using cPanel WP Toolkit. This process is streamlined and can be done quickly.
cPanel WP Toolkit is available on Ecenica Managed WordPress Hosting purchased from October 2024 onward. Please check your Ecenica hosting plan for availability.
Prerequisites:
- Backup both the staging and live sites using JetBackup before making any changes to avoid potential data loss. Use the ‘Create Backup on Demand’ tool in JetBackup to create a new backup. You can locate JetBackups in cPanel > JetBackup or in your Ecenica Dashboard > Service Overview page.
Steps:
- Log in to cPanel:
- Go to your cPanel account and log in.
- Access WP Toolkit:
- In the cPanel dashboard, locate and click on the “WordPress Toolkit” icon. This will open the WP Toolkit interface where you can manage your WordPress installations.
- Open the Staging Site Dashboard:
- In WP Toolkit, find the staging site you wish to copy to the live site. If needed, click on the tab header to reveal the website dashboard options.
- Click the Copy Data Tool:
- In the staging site dashboard, click on the “Copy Data” tool. This option will allow you to select which elements from the staging site you want to push to the production site.
- Select the Target (Production) Site:
- In the Copy Data interface, select your live (production) site from the Target dropdown menu. Ensure you’re selecting the correct site to avoid overwriting the wrong one.
- Choose What to Copy:
- WP Toolkit provides fine-grained control over what data you want to copy:
- Files – Choose to copy the files from the staging site to the live site.
- Database – Choose to copy the entire database or specific tables.
- Database Tables – You can choose to exclude certain tables, such as posts or user tables, if needed.
- If you want, you can also opt to overwrite and delete production files that were removed or edited on the staging site.
- WP Toolkit provides fine-grained control over what data you want to copy:
- Example: You can copy everything except for the post and user tables, ensuring that posts and users created after the staging site was set up are preserved.
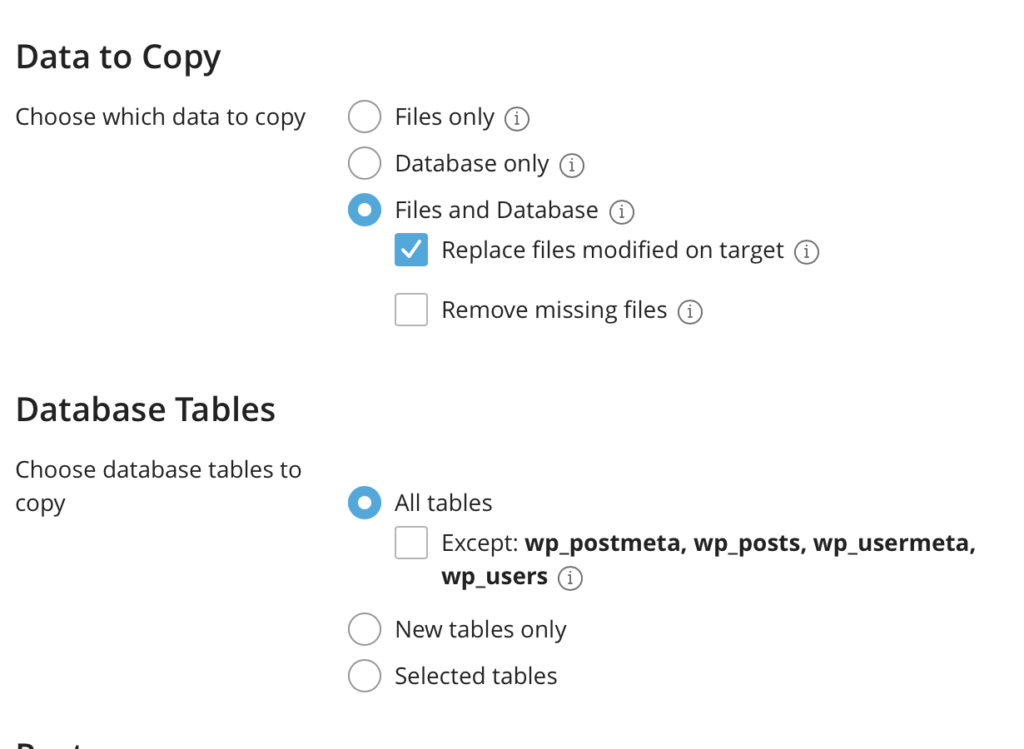
You have fine-grained control over which aspects of the site are transferred
-
Confirm and Create a Restore Point:
- Because this is a potentially destructive operation, WP Toolkit will automatically create a restore point. This allows you to quickly roll back to the previous state if something goes wrong during the copy process.
- Initiate the Copy Process:
- Once you’ve made your selections, press the Start button to begin the process of pushing the staging site’s changes to the live site.
- Wait for the Process to Complete:
- The copy process will take a few minutes, depending on the size of the website and the data being transferred.
- Verify the Live Site:
- After the copy process is complete, visit your live website to ensure everything is functioning as expected.
- Check the design, content, and any functionality changes you made on the staging site.
Additional Tips:
- Backup Regularly: Always back up both the staging and live sites using JetBackup in cPanel before pushing changes to avoid data loss.
Ecenica Backups are powered by JetBackup and provide automatic daily backups to ensure your data is safe. - Clear Caches: After copying the staging site to live, clear any caching plugins and browser cache to ensure you see the most up-to-date version of your site.
